When customers shop online, one of the first things they want to know is: “When will my order arrive?” If your Shopify store does not show delivery estimates, you may be losing conversions and getting flooded with “Where is my order?” messages.
The good news: you can solve this with the Essential Estimated Delivery Date Shopify app. It lets you show accurate estimated delivery times on product pages and carts without coding.
In this guide, we will walk through how to add estimated delivery time on Shopify, step by step, plus some best practices to make your delivery promises clear and trustworthy.
Why Add Estimated Delivery Time to Shopify
Adding estimated delivery times is not just about logistics; it is about customer psychology and business performance. A clear ETA reduces uncertainty, builds trust, and keeps your support inbox quieter. Let’s break down the main benefits.
Boost Conversions by Reducing Uncertainty
One of the biggest reasons customers abandon carts is not knowing when their order will arrive. If the only clue comes at checkout in the form of “Standard shipping: 3–5 business days,” shoppers may hesitate. Showing a clear delivery window on product pages, like “Arrives by Oct 25” or “Estimated delivery: Oct 23–27”, gives buyers confidence to complete their purchase.
Build Customer Trust and Loyalty
Transparent communication is one of the strongest signals of reliability. When you show estimated delivery times upfront, you are telling customers you respect their time and expectations. This not only helps win the initial sale but also encourages repeat purchases, since customers are more likely to return to a store that delivered on its promise.
Reduce Customer Support Tickets
Every merchant knows the pain of “Where is my order?” emails. By displaying a delivery estimate directly on product and cart pages, you address that concern before it becomes a support request. Fewer repetitive inquiries mean your support team can focus on higher-value tasks, and your customers feel informed without having to reach out.
Stay Competitive in a Crowded Market
Marketplaces like Amazon have conditioned customers to expect clarity and precision around delivery dates. If your Shopify store does not offer a similar level of transparency, you risk losing buyers to competitors who do. Adding delivery estimates helps you stand out and level the playing field against larger retailers.

How to Add Estimated Delivery Time on Shopify (Step by Step)
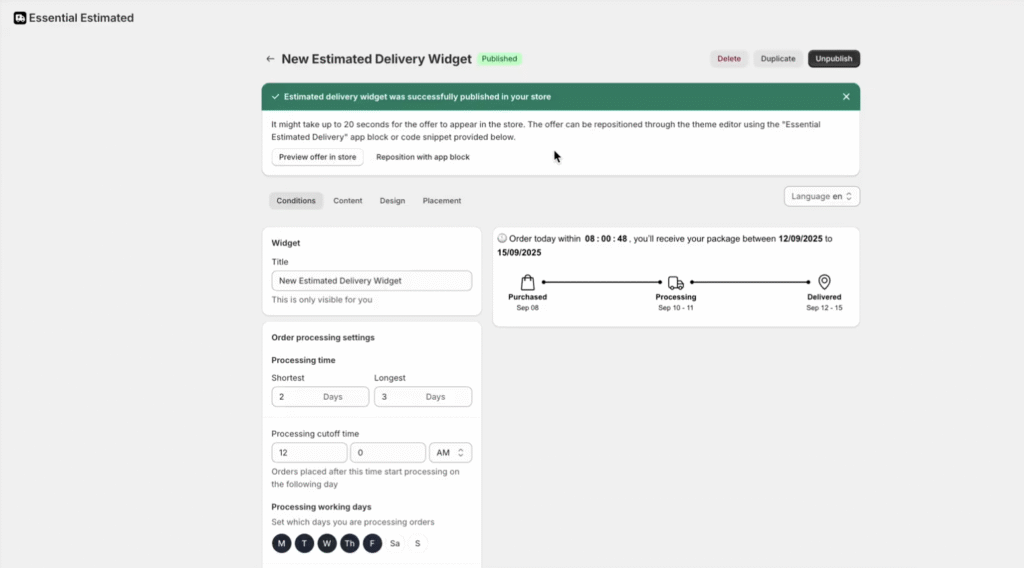
To get started, install the Essential Shopify Estimated Delivery Date App from the Shopify App Store. Once installed, open the app, activate it, and enable the app embed through the Setup Guide. Save your theme settings so the app can run on your storefront. With this one-time setup complete, you are ready to create your first delivery widget:
1. Open the Essential Shopify Estimated Delivery Date App
2. Start a New Widget
Click Create delivery widget.
3. Name the Widget
Add an internal title (only visible to you).
4. Configure Processing Settings
- Processing time (days): set the shortest and longest processing time.
- Cutoff time: define the daily order cutoff (orders after this are processed the next day).
- Working days: select which days you process orders.
- Blocked dates: add holidays or exceptions (use the “+” to add multiple).
5. Configure Transit Settings
- Transit time (days): set the shortest and longest shipping range.
- Transit days: pick which days deliveries can be in transit.
6. Add Content
Write customer-facing text using dynamic variables:
{counter}– countdown until the cutoff time{ordered_date}– order date{processing_from} / {processing_to}– processing window{delivery_from} / {delivery_to}– delivery window
You can also adjust:
- Date format & separator: choose whether to include the year, set a dash or slash, etc.
- Step labels & visuals: titles, icons, colors — defaults are Purchased, Processing, Delivered, but you can rename them.
- Translations: add translated descriptions and step titles if your store is multilingual.
7. Design the Widget
Click Continue to Design and adjust border, background, spacing, and typography to match your brand.
8. Placement
Decide where the widget shows:
- All products
- Specific collections
- Specific products
9. Review & Publish
Check your settings and click Publish. If something is missing (like activation), you will see an error banner.
10. Verify & Support
Preview your product pages to confirm the widget looks correct.
Check the timer in the Setup Guide. If something seems off, contact our support team for fast help.
Next Steps: You can duplicate widgets, assign them to new products, or refine existing ones as your shipping rules change.