How To Create Standout Shopify Announcement Bars?
Creating a standout Shopify announcement bar can be a real headache. There are many types of Shopify announcement bars, endless strategic considerations, the perfect balance between visibility and simplicity… And don’t get us started on coding! Luckily, creating standout Shopify announcement bars doesn’t have to be difficult and time-consuming!
Some Shopify themes already offer a built-in announcement bar feature. While this is a good starting point, it might lack the advanced features you desire.
For the tech-savvy, custom coding can be a great option. But not everyone is equipped with coding expertise to customize announcement bars manually, right? And even if you are, the process can still be time-consuming and prone to errors.
Which leaves us with the real game-changer *drum roll* – Shopify Announcement Bar apps. These tools, like the Essential Announcement Bar app, are designed to simplify the process and create attention-grabbing bars in a few clicks.
Avoid The Headache with Essential Announcement Bar
Shopify merchants are loving the Essential Announcement Bar. And what’s not to like? It offers intuitive user interface, extensive customization features, effortless integration options and so much more. It’s basically your stress-free way of creating eye-catching announcement bars that will resonate with your audience.
Effortless Customization
Choose from 20 pre-made templates, tweak colors, fonts, and styles with just a few clicks – no coding expertise required.
Versatility
Tailor your website announcement bar to suit different campaigns and place it anywhere on your page, ensuring it always complements your store’s vibe. Oh, and did we mention that all Essential announcement bars have an integrated “Call to Action” button that allows you to direct all traffic to the desired page and increase sales?
Seamless Integration
Worried about compatibility? Worry not. Essential Announcement Bar seamlessly integrates with Shopify 2.0, which means your Announcement Bar will not only look great, but will also work seamlessly with your Shopify theme.
Responsiveness
According to the software development specialists at Netcorp, responsiveness is non-negotiable. Whether your customers prefer desktop or mobile shopping, Essential Announcement Bar ensures your announcement bar will look perfect and convey your message effectively.
The Best Shopify Announcement Bar Examples
Theory is fun, but it’s time to draw real inspiration from the pros who are already doing it! Here are some of our favorite website announcement bar examples and, more importantly, our tips on how you can recreate these eye-catching bars using the Essential Announcement Bar.
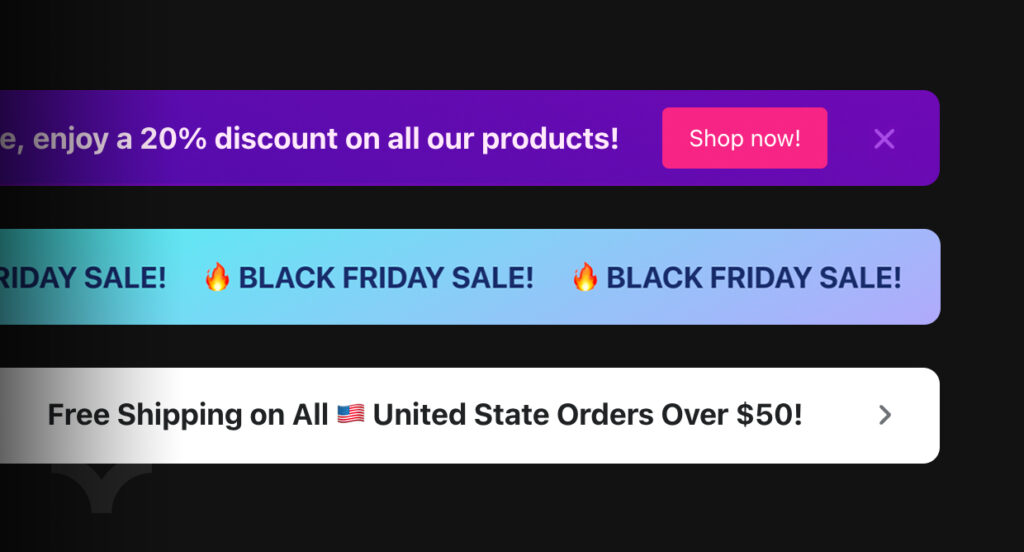
Shopify’s Scrolling Announcement Bar
Simple yet eye-catching, Shopify scrolling announcement bar seamlessly glides across the top of the webpage immediately grabbing the visitors’ attention and encouraging engagement. The scrolling feature adds dynamics without overpowering the message.
Recreate it Using Essential Announcement Bar app
- Kick off by crafting a fresh Announcement Bar.
- Select the ‘Running Line’ as your go-to announcement style.
- Name your announcement whatever tickles your fancy—it’s just for you to recognize.
- Headline time! Hit ’em with a “START YOUR FREE TRIAL” and sprinkle in some emojis for that extra zing.
- Play with the animation pace. Aim for a middle-of-the-road speed for this walk-through.
- Skip the call-to-action this round; we’re going for a ‘No call to action’.
- Uncheck the close icon.
- Next stop: Design.
- Position’s a free-for-all since we’re diving into Custom Position later.
- Let the Sticky bar sit this one out—keep it unchecked.
- Color time! Match your site’s mojo with our pre-set vibes or dial in your custom palette.
- Flip on Gradient background to mimic that Shopify bar.
- Tweak those corners, borders, and fonts to perfection.
- Onward to placement choices!
- Choose a Custom position.
- Embed the announcement bar in your store with App Blocks (more on them later) or an App Snippet, and you’re golden!
Rotating Announcement Bar by Kylie Cosmetics
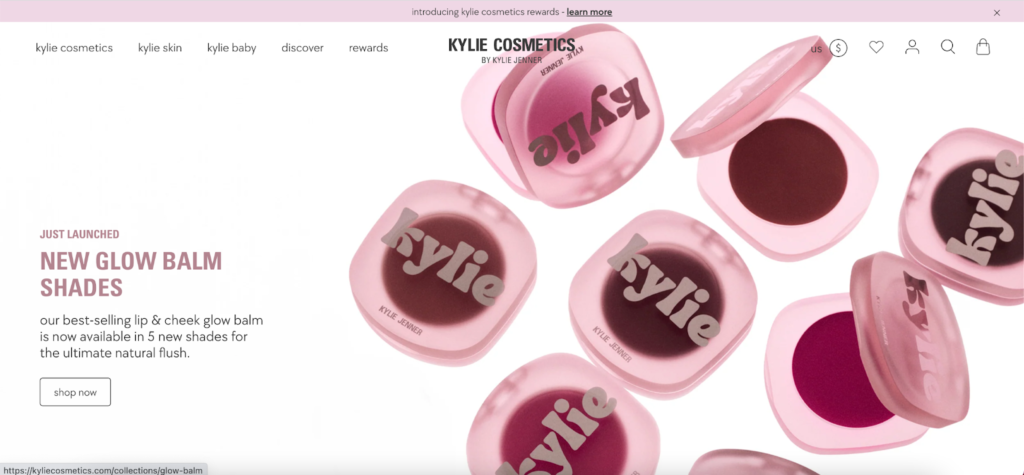
A rotating announcement bar doesn’t have to be flashy to make an impact, and Kylie Cosmetics minimalistic and chic announcement bar proves it. What really makes it stand out, though, is how smoothly and seamlessly its color scheme aligns with the brand colors! It makes it so effortless, so easy on the eyes, yet impossible to ignore, attention-grabbing without being intrusive.
Recreate it Using Essential Announcement Bar app
- Get the ball rolling with a brand-new Announcement Bar.
- Tap ‘Multiple Rotating Announcements’ for your announcement flair.
- The announcement’s name? That’s your call—it’s for your eyes only.
- Set the scene with an Announcement display duration. Think 5 seconds of spotlight for each.
- Title and subhead? Carve them out your way.
- Echoing the Kylie vibe, Announcement #1 screams “Enjoy our awesome international shipping rates”—no subhead, no fuss with calls to action buttons.
- Announcement #2 drops the scoop: “Introducing new product” with the product name as a subhead and a nifty button linking straight to the product page.
- Wanna stack more announcements? Pile ’em on by clicking the ‘Add new announcement’ button.
- Uncheck close icon.
- Slide into Design mode.
- Top Page is your stage for positioning.
- Sticky bar or not? Your playground, your rules.
- For that Kylie signature, opt for a Single Color Background—#EFD7E5 is the color code.
- Nudge those corners, borders, and fonts into your style.
- If you want to hide arrows, choose the arrow icon color the same as bar background color.
- Propel into placement.
- Pick your display spots—we’d go with ‘Every page’.
- And just like that, hit Publish on your timer.
Asos Countdown Timer Announcement Bar
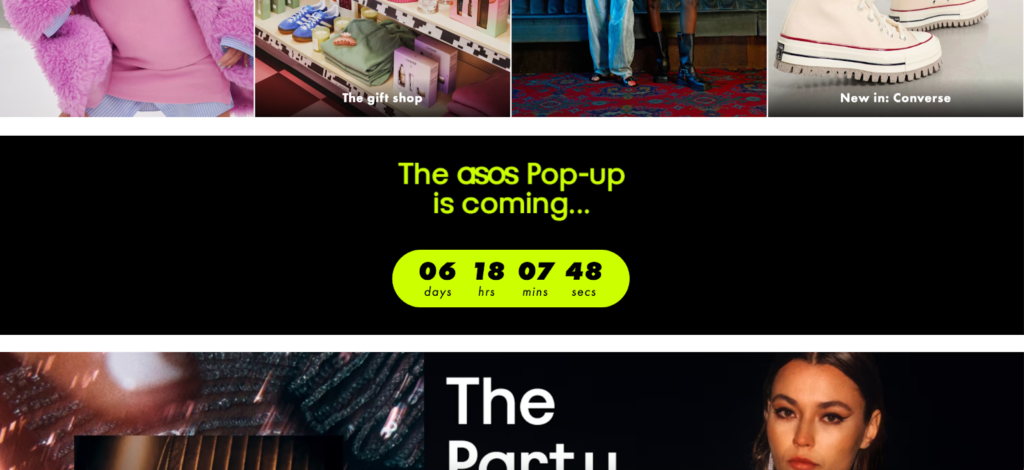
Did anyone order a portion of urgency into the shopping experience? Asos knows that the ticking clock is a powerful motivator and are not afraid to use it. This announcement bar features a countdown timer, creating a sense of urgency that compels customers to act quickly. And did you notice – Asos placed its announcement bar in-between other blocks of a page, yet the announcement bar steals all the attention? This balance is key – making an impact, pushing customers to act without overshadowing the overall shopping experience.
Recreate it Using Essential Announcement Bar app
- Get started by setting up a new Countdown Timer Bar.
- For the timer type, select ‘Landing page’.
- Give your countdown a name—any name that helps you keep track.
- Set up your titles and any subheads as you see fit.
- Taking a leaf from Asos’s book, the title will be “The store Pop-up is coming…” Skip the subheading and call to action.
- Pick ‘countdown to a date’ for the timer type to build the hype.
- Move on to the Design phase.
- Asos rocks a Single Color Background in black—let’s match that.
- Keep those borders crisp and set the border radius to 0px. To bulk up your bar, bump up the spacing inside the top and bottom—I’m going for 80px.
- The title, timer, and legend will pop in Neon Green, color code #CCFF00.
- Next, decide on Placement.
- We’re choosing Custom Position to feature it on the home page.
- Publish your countdown timer announcement bar and place it onto your home page using app blocks.
Udemy Countdown Timer Announcement Bar
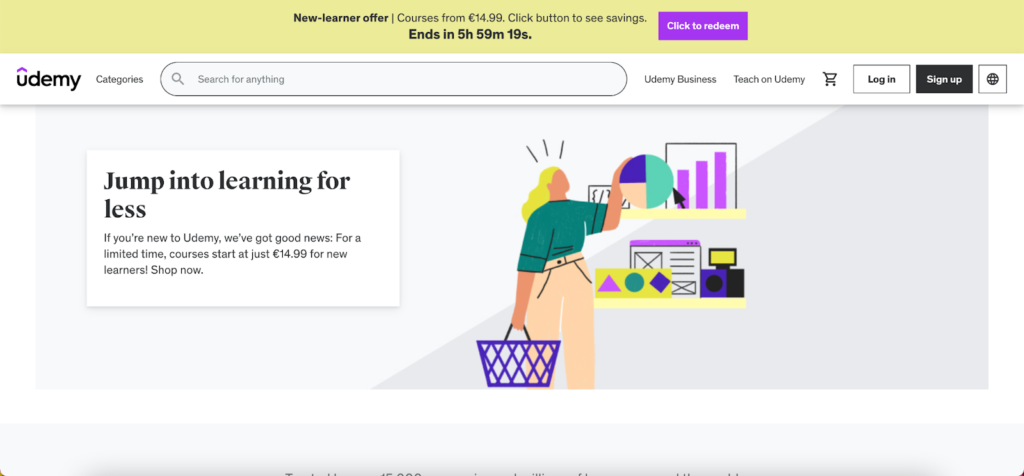
Another great example of using urgency for a more powerful impact. This Udemy example incorporates a countdown timer strategically at the top of the page signaling the limited nature of the offer. This clever move not only creates a buzz but also nudges potential learners to make a decision quicker.
Recreate it Using Essential Announcement Bar app
- Kick things off by creating a New Countdown Timer Bar.
- Pick ‘Top/bottom bar’ as your timer type.
- Name your countdown whatever helps you keep tabs on it.
- Craft your titles and subheadings to suit your message.
- Taking a cue from Udemy, your title is “New-learner offer | Courses from €14.99” with a “Click button to see savings” subhead. Set up a button for the call to action with “Click to redeem” text.
- Link the button to the relevant deals page.
- Udemy’s timer resets daily, so select the daily recurring timer option.
- Schedule the start time and active days.
- Head into Design.
- Set your bar’s position to the top of the page.
- Keep the sticky bar option unticked.
- For that Udemy look, opt for a Single Color Background in #eceb98. Match the button color with #a435f0.
- For sharp button corners, set the corner radius to 0px.
- Go on to Placement.
- Choose where you want to display the timer.
- Go ahead and publish your timer.
Verizon’s Sticky Announcement Bar
The tech giant Verizon is all about simplicity in its sticky announcement bar, and we are not mad about it. A sleek, unobtrusive bar stays fixed at the top, providing essential information without overpowering the browsing experience, ensuring that visitors always stay alert without distraction and making sure nothing gets missed.
Recreate it Using Essential Announcement Bar app
- Start by creating a new Announcement Bar.
- Pick ‘Simple announcement’ for the type.
- Name the announcement anything you like—it’s just for your reference.
- Decide on your titles and subheads.
- Mimicking the Verizon offer, your announcement title will read: “iPhone 14 Plus. Get four, on us. All on Unlimited Welcome for $120/mo. With Auto Pay. Plus taxes and fees. New lines required. No trade-in required. Online only.” No need for a subhead, and set call to action as a button.
- Customize your button text. We’re going with “Buy Now” which will link to the product page.
- Skip the close icon option.
- Move on to Design.
- Set the bar’s position to the Top Page.
- Choose the Sticky Bar option to keep it in view during scrolling.
- Verizon uses a single color background on the page, so opt for that. The color code is #333333, which I’ll use too.
- Since the title’s a bit lengthy, shrink the font size to fit it all in one line—let’s say, 10px.
- We’re also making the button blend in by matching its background color with the bar.
- Head over to Placement.
- Decide where you want it seen. We’ll stick with the ‘Every page’ option.
- Hit Publish on your timer.
To get it right under your header like Verizon, opt for a custom position instead of ‘Every page’ and use app blocks to place your timer.
Multiple Rotating Announcement Bars by Nike

Nike understands that a one-size-fits-all approach doesn’t always work. Their website showcases multiple rotating announcement bar examples, each highlighting a different aspect of their marketing communication and making sure they highlight the bigger, more limited and urgent promotion. This approach demonstrates the power of diversity in messaging and tailoring your announcements for maximum impact and audience engagement.
Recreate it Using Essential Announcement Bar app
- Go ahead and create a new Announcement Bar.
- Opt for ‘Multiple rotating announcements’ as your style.
- Label the announcement whatever makes sense to you—it’s just for your reference.
- Tailor your titles and subheadings to fit your message.
- Channeling that Nike energy, make Announcement #1 title: “Holiday Favs Sale | Extra 25% Off
 ” with the subheading: “Sign in and use code CELEBRATE to save on select styles.” Make the entire bar clickable as a call to action.
 - For Announcement #2, set the title as “Jordan Featured Offer: Ends 12.5
 ” with a “Shop now” subhead and a similar entire clickable bar.
 - Link your call to actions to the relevant pages for direct navigation.
- Uncheck the close icon.
- Jump to Design.
- Anchor your bar at the Top Page.
- Don’t tick the Sticky Bar option.
- Stick with a Single Color Background like Nike’s, which is #f5f5f5.
- Conceal the arrows by matching their color to the bar background.
- Proceed to Placement.
- Display it on ‘Every page’.
- Time to publish your timer.
For a setup like Nike, just under your header, select a custom position and arrange the timer with app blocks. And if you need text centered like Nike’s page, reach out for custom code assistance, we’re here to help.
How To Add Announcement Bar Using App Blocks
Does your theme support Shopify Online Store 2.0? If so, you are in luck as it is your shortcut to seamlessly integrate the Essential Announcement Bar into your Shopify store! How to do it? Here’s a quick guide for you.
To place the announcement bar on the site using app blocks, follow these steps:
- Dive into the ‘Customization’ section of your store’s theme.
- Decide where you want your timer to show up.
- Toss in a new section or app block based on where you’re aiming to place the bar.
- Click on ‘Apps’.
- Select ‘Announcement Bar’ or ‘Countdown Timer’, whichever you’ve set up.
- Once the app block pops up, give it a quick double-click and punch in the ID to see your bar come to life.
- Feel free to shuffle the position of your bar around with a simple drag-and-drop of the app block.
Extra tips
Hopefully, these powerful Shopify announcement bar ideas have inspired you. But as you embark on your journey to create an attention-grabbing announcement bar, don’t forget:
- Ensure your announcement bar aligns seamlessly with your brand’s visual identity. Consistent color schemes, fonts, and styles reinforce brand recognition.
- Less is more – don’t overcrowd your announcement bar with too much information. Craft concise and compelling messages that convey your announcement without overwhelming the customers.
- If you have specific design preferences beyond the Essential Announcement Bar app’s default settings, feel free to reach out. We offer customization assistance, including CSS tweaks for height, fonts, font weight, and style. We’re here to help you make your announcement bar truly standout and reflect your unique brand personality.
Conclusion
Announcement bars are not just for the big brands with resources. They don’t have to be time-consuming or difficult to figure out. Simplify the complex, redefine how you communicate with your customers and turn your announcement bars into engaging experiences for your customers and revenue-boosting tools for your store with one Essential Announcement Bar app. Try it out and see for yourself.